> ## Documentation Index
> Fetch the complete documentation index at: https://docs.2501.ai/llms.txt
> Use this file to discover all available pages before exploring further.
# Users
> Manage users and permissions from the Command Center
## Managing users
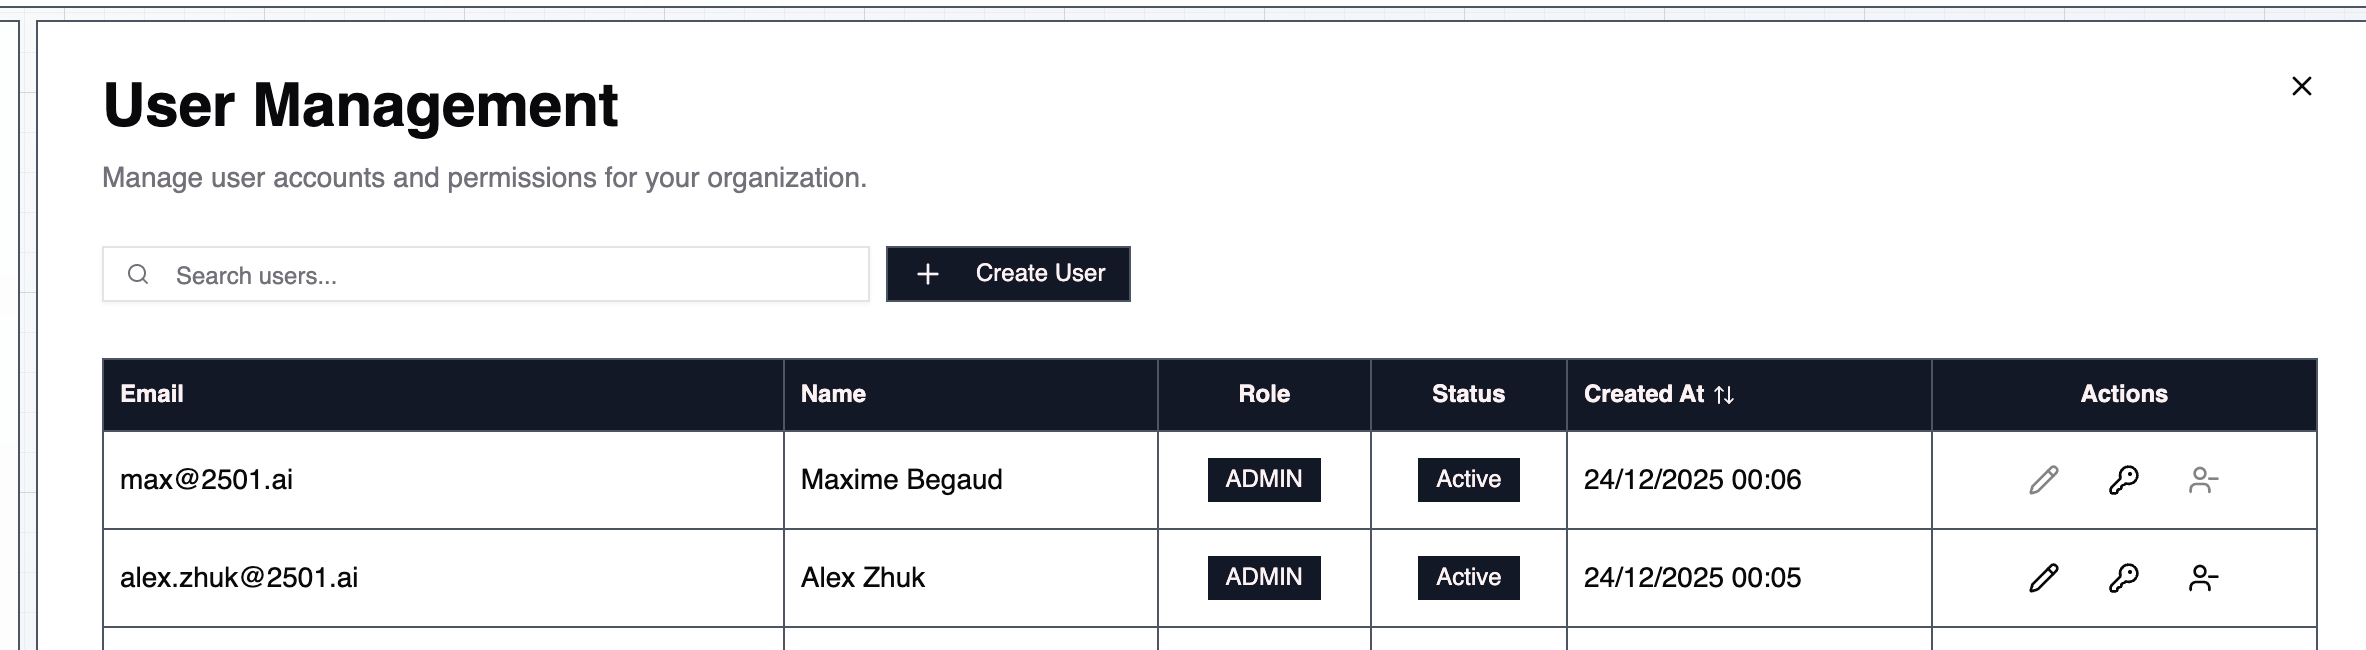
In your Command Center, Administrator users will be able to see a "Users" tab on the **Settings** page.
From this tab, you are able to create, update, or modify users able to access your 2501 interface.
 ## Roles
2501 supports three roles: Administrator, User, and Auditor. Each role has different levels of access to resources and operations.
Every role can update their own name and email and change their own password from **Account**. Open it by clicking your email or an Account icon. This does not let you change your role or organization access.
### Administrator
The administrator user has access to all pages of the Command Center and can modify every resource 2501 manages.
Administrators can create new users with the button **"Create User"** and assign them a role.
The password you set for a new user is temporary. On first sign-in, they must choose
a different password that meets the password requirements before they can access
Command Center. After saving it, they sign in with their new password; the temporary
password no longer works. If your organization requires two-factor authentication,
setup follows that sign-in. Existing accounts are not asked to change their password,
and neither is an account whose password you reset later.
To revoke a user's access to Command Center, deactivate the user from the table. Their sessions end and they cannot sign in, while their related records are preserved. Reactivating the account requires a fresh sign-in; old sessions do not become valid again.
You may also want to reset a user's password (including administrators), using the reset-password action.
Note on passwords: a password must contain at least 8 characters, including at least one uppercase letter, one lowercase letter, one number, and one special character.
**Permissions:**
* Full read and write access to all resources across all organizations
* Can create, modify, and delete users
* Can manage organizations and tenant settings
Organization-level administrators see users in their own organizations and tenant-level users. A user's membership details show only organizations the administrator can access.
### User
Regular users can read and write resources within their assigned organizations, but have **read-only access** to shared (tenant-wide) resources such as specialties, operational rules, credentials, and blacklists that are not scoped to a specific organization.
Regular users do not have access to the "Users" page and cannot manage other users or organizations.
**Permissions:**
* Read and write access to org-scoped resources (agents, hosts, tasks, jobs, etc.) in assigned organizations
* Read-only access to shared resources (specialties, operational rules, credentials, blacklists with no organization scope)
* Read-only access to organization and tenant information
* No access to user management
### Auditor
Auditors have read-only access across all managed resources they can see. They share the same visibility as the User role but cannot create, modify, or delete those resources.
**Permissions:**
* Read-only access to org-scoped resources in assigned organizations
* Read-only access to shared resources
* Read-only access to organization and tenant information
* No write access to managed resources or tenant settings
* No access to user management
## Sessions
A Command Center session ends after a period without activity (30 minutes by default), and a fixed time after sign-in even while it is being used (12 hours by default).
A tenant-level Administrator can open **Settings > Security**, then choose **Edit** in the **User sessions** section. Enter each duration in minutes, hours or days, or select **Never sign out for inactivity** to turn off idle sign-out. Neither limit can be below 5 minutes or above a year, and the idle limit cannot exceed the maximum session length. **Save session limits** applies the changes; **Cancel** discards the edits. The maximum session length cannot be turned off.
Only what a person does counts as activity: saving a change, or pointer and keyboard input reported by the browser. A tab left open on a screen that refreshes itself does not keep the session alive. The first action after a limit passes lands on the sign-in page; signing in again opens a fresh session. A page left open does not wait for that action: it stops updating and returns to the sign-in page when the session ends.
Each request uses the current limits. Lowering either limit can end an open session on its next request. A raised idle limit applies to sessions that have not yet been refused or signed out. Every session also keeps the maximum deadline it received at sign-in: increasing the maximum session length cannot extend that original deadline. Sign in again to start a new session under the current limits.
## Sign-in Protection
Repeated sign-in attempts are rate-limited to guard against password guessing.
## Two-factor authentication
Open **Account** from the person icon in the header and select **Set up 2FA**. Follow the three steps: confirm your password, scan the setup key with an authenticator app and verify its code, then save your ten backup codes. You can copy or download them before selecting **I have saved my codes**. Each backup code signs you in once if you cannot use your authenticator, and goes in the same field as an authenticator code.
Completing setup keeps this browser signed in and ends your other sessions. Your backup codes stay on screen so you can save them. Setup does not extend your current session's lifetime.
Each sign-in challenge allows five failed code attempts and lasts ten minutes. Once either limit is reached, return to the sign-in page and enter your password to start again.
Separately, ten wrong codes in a row lock code verification for your account for 15 minutes. This count is shared across sign-in challenges and sensitive actions. Starting sign-in again does not clear this lock; wait for the 15 minutes to pass.
Each authenticator code is accepted once. Entering it again, or entering an older code after it, is refused with a message saying the code has already been used; the next code your app shows is accepted. Two actions in a row take two codes, so wait for your app to show the next one, at most 30 seconds.
If you enable 2FA in another browser, a session that has only passed your password must sign in again. Its live updates and log streams stop within one minute.
After setup, the **Authenticator app** row offers **Manage** to show the same setup key on another device. Both authenticators generate the same codes. The **Backup codes** row offers **Replace codes**, which invalidates the previous set after confirmation. **Disable 2FA** is below these controls. These actions require a current authenticator code. Your signed-in session supplies the first factor, so you do not enter your password again. Backup codes are for sign-in and cannot authorize these account changes. Administering another administrator asks for the same proof: creating one, promoting a user into one, changing its role or its access to the whole tenant, or resetting its password. Creating, editing or resetting a user or an auditor does not, and neither does renaming an account or turning it off.
A tenant-level Administrator can require 2FA for everyone from **Settings > Security**: select **Edit** in the **Two-factor authentication** section. The section shows how many active users have enabled it; **View users** opens the full list. At least one active Administrator must have set it up first. Review the impact, select **Save 2FA settings**, then confirm with a current authenticator code if you have 2FA. Users without 2FA must complete setup before accessing the app, and nobody can disable their own 2FA while the requirement is on.
The same editor sets for how many hours a browser that has passed the code step may skip it, from 0 (never, the default) to 12. Where it is above zero, the code step offers **Remember this browser**; the choice is bound to that browser and runs from the moment it is made, so signing in again does not extend it. Resetting or disabling a user's 2FA forgets the browsers remembered for that user. Lowering the hours forgets every browser in the tenant and signs everyone out, you included, so the shorter window is in force at once rather than as the old ones run out.
If you lose your authenticator, use a backup code to sign in. If you have none left, a tenant-level Administrator can open **Settings > Security > View users** and select **Reset 2FA** on your row. If they have 2FA, they confirm with their own authenticator code. Otherwise, they confirm using their signed-in session. A reset signs every device out of the account, including the one that held the lost authenticator. You can then sign in with your password and set up a new authenticator. Where the tenant requires 2FA, setup must be completed before accessing the app. If no Administrator can sign in, an operator can run `2501 infra two-factor reset ` on the server that runs the Command Center.
## Organization Access
Regardless of their role, any user can be granted access at two levels:
* **Organization-level access**: The user can only see and interact with resources in their explicitly assigned organizations.
* **Tenant-level access**: The user can see and interact with resources across all organizations in the tenant, including any organizations created in the future.
This applies to all roles. An Administrator with organization-level access will only manage resources within their assigned organizations, while an Auditor with tenant-level access can audit all organizations.
Tenant-level access is configured when creating or updating a user via the CLI. See [Users & Organizations](/0.14/deployment/users-organizations) for details.
## Roles
2501 supports three roles: Administrator, User, and Auditor. Each role has different levels of access to resources and operations.
Every role can update their own name and email and change their own password from **Account**. Open it by clicking your email or an Account icon. This does not let you change your role or organization access.
### Administrator
The administrator user has access to all pages of the Command Center and can modify every resource 2501 manages.
Administrators can create new users with the button **"Create User"** and assign them a role.
The password you set for a new user is temporary. On first sign-in, they must choose
a different password that meets the password requirements before they can access
Command Center. After saving it, they sign in with their new password; the temporary
password no longer works. If your organization requires two-factor authentication,
setup follows that sign-in. Existing accounts are not asked to change their password,
and neither is an account whose password you reset later.
To revoke a user's access to Command Center, deactivate the user from the table. Their sessions end and they cannot sign in, while their related records are preserved. Reactivating the account requires a fresh sign-in; old sessions do not become valid again.
You may also want to reset a user's password (including administrators), using the reset-password action.
Note on passwords: a password must contain at least 8 characters, including at least one uppercase letter, one lowercase letter, one number, and one special character.
**Permissions:**
* Full read and write access to all resources across all organizations
* Can create, modify, and delete users
* Can manage organizations and tenant settings
Organization-level administrators see users in their own organizations and tenant-level users. A user's membership details show only organizations the administrator can access.
### User
Regular users can read and write resources within their assigned organizations, but have **read-only access** to shared (tenant-wide) resources such as specialties, operational rules, credentials, and blacklists that are not scoped to a specific organization.
Regular users do not have access to the "Users" page and cannot manage other users or organizations.
**Permissions:**
* Read and write access to org-scoped resources (agents, hosts, tasks, jobs, etc.) in assigned organizations
* Read-only access to shared resources (specialties, operational rules, credentials, blacklists with no organization scope)
* Read-only access to organization and tenant information
* No access to user management
### Auditor
Auditors have read-only access across all managed resources they can see. They share the same visibility as the User role but cannot create, modify, or delete those resources.
**Permissions:**
* Read-only access to org-scoped resources in assigned organizations
* Read-only access to shared resources
* Read-only access to organization and tenant information
* No write access to managed resources or tenant settings
* No access to user management
## Sessions
A Command Center session ends after a period without activity (30 minutes by default), and a fixed time after sign-in even while it is being used (12 hours by default).
A tenant-level Administrator can open **Settings > Security**, then choose **Edit** in the **User sessions** section. Enter each duration in minutes, hours or days, or select **Never sign out for inactivity** to turn off idle sign-out. Neither limit can be below 5 minutes or above a year, and the idle limit cannot exceed the maximum session length. **Save session limits** applies the changes; **Cancel** discards the edits. The maximum session length cannot be turned off.
Only what a person does counts as activity: saving a change, or pointer and keyboard input reported by the browser. A tab left open on a screen that refreshes itself does not keep the session alive. The first action after a limit passes lands on the sign-in page; signing in again opens a fresh session. A page left open does not wait for that action: it stops updating and returns to the sign-in page when the session ends.
Each request uses the current limits. Lowering either limit can end an open session on its next request. A raised idle limit applies to sessions that have not yet been refused or signed out. Every session also keeps the maximum deadline it received at sign-in: increasing the maximum session length cannot extend that original deadline. Sign in again to start a new session under the current limits.
## Sign-in Protection
Repeated sign-in attempts are rate-limited to guard against password guessing.
## Two-factor authentication
Open **Account** from the person icon in the header and select **Set up 2FA**. Follow the three steps: confirm your password, scan the setup key with an authenticator app and verify its code, then save your ten backup codes. You can copy or download them before selecting **I have saved my codes**. Each backup code signs you in once if you cannot use your authenticator, and goes in the same field as an authenticator code.
Completing setup keeps this browser signed in and ends your other sessions. Your backup codes stay on screen so you can save them. Setup does not extend your current session's lifetime.
Each sign-in challenge allows five failed code attempts and lasts ten minutes. Once either limit is reached, return to the sign-in page and enter your password to start again.
Separately, ten wrong codes in a row lock code verification for your account for 15 minutes. This count is shared across sign-in challenges and sensitive actions. Starting sign-in again does not clear this lock; wait for the 15 minutes to pass.
Each authenticator code is accepted once. Entering it again, or entering an older code after it, is refused with a message saying the code has already been used; the next code your app shows is accepted. Two actions in a row take two codes, so wait for your app to show the next one, at most 30 seconds.
If you enable 2FA in another browser, a session that has only passed your password must sign in again. Its live updates and log streams stop within one minute.
After setup, the **Authenticator app** row offers **Manage** to show the same setup key on another device. Both authenticators generate the same codes. The **Backup codes** row offers **Replace codes**, which invalidates the previous set after confirmation. **Disable 2FA** is below these controls. These actions require a current authenticator code. Your signed-in session supplies the first factor, so you do not enter your password again. Backup codes are for sign-in and cannot authorize these account changes. Administering another administrator asks for the same proof: creating one, promoting a user into one, changing its role or its access to the whole tenant, or resetting its password. Creating, editing or resetting a user or an auditor does not, and neither does renaming an account or turning it off.
A tenant-level Administrator can require 2FA for everyone from **Settings > Security**: select **Edit** in the **Two-factor authentication** section. The section shows how many active users have enabled it; **View users** opens the full list. At least one active Administrator must have set it up first. Review the impact, select **Save 2FA settings**, then confirm with a current authenticator code if you have 2FA. Users without 2FA must complete setup before accessing the app, and nobody can disable their own 2FA while the requirement is on.
The same editor sets for how many hours a browser that has passed the code step may skip it, from 0 (never, the default) to 12. Where it is above zero, the code step offers **Remember this browser**; the choice is bound to that browser and runs from the moment it is made, so signing in again does not extend it. Resetting or disabling a user's 2FA forgets the browsers remembered for that user. Lowering the hours forgets every browser in the tenant and signs everyone out, you included, so the shorter window is in force at once rather than as the old ones run out.
If you lose your authenticator, use a backup code to sign in. If you have none left, a tenant-level Administrator can open **Settings > Security > View users** and select **Reset 2FA** on your row. If they have 2FA, they confirm with their own authenticator code. Otherwise, they confirm using their signed-in session. A reset signs every device out of the account, including the one that held the lost authenticator. You can then sign in with your password and set up a new authenticator. Where the tenant requires 2FA, setup must be completed before accessing the app. If no Administrator can sign in, an operator can run `2501 infra two-factor reset ` on the server that runs the Command Center.
## Organization Access
Regardless of their role, any user can be granted access at two levels:
* **Organization-level access**: The user can only see and interact with resources in their explicitly assigned organizations.
* **Tenant-level access**: The user can see and interact with resources across all organizations in the tenant, including any organizations created in the future.
This applies to all roles. An Administrator with organization-level access will only manage resources within their assigned organizations, while an Auditor with tenant-level access can audit all organizations.
Tenant-level access is configured when creating or updating a user via the CLI. See [Users & Organizations](/0.14/deployment/users-organizations) for details.